Search

Powered by Blogger.

Networked Blogs

Showing posts with label fun. Show all posts

Tuesday, July 2, 2013

Frugal Vacationing


Everybody loves to take a vacation, but sometimes finances seem like they may be a hindrance to being able to take one.  You CAN take one and have a great time with a little planning and creativity.  We live for our vacation every summer.  It's the one time where we are together as a family without the pressure of everyday life.  Instead, our time is devoted to fun and relaxation.  


You don't have to go far.  Even a staycation can be fun or, if you really want to go somewhere, consider a short drive to either another part of your state or another state that is nearby. 


As soon as we finish one vacation, we start planning and saving for the next year's vacation.  We decide where we want to go, what we want to see, and then begin planning accordingly.  We put a couple of bucks aside every paycheck.  If we do something like have a garage sale or sell a household item, that goes into the vacation fund.  We have pecan trees, and we sell the pecans and bank that.  We've even picked up aluminum cans, cashed them in, and put that into our vacation fund.  It all adds up, even a little at a time.  We guard that vacation fund! 


We are the outdoorsy types.  We love hiking and getting back in the wilderness.   A day spent hiking back into the woods is the ideal ticket for us, but others might enjoy being near the ocean, a lake, a river, or out in the desert.  These are my personal recommendations for what works for us.  Hopefully, you will find some ideas to spark your imagination and help you plan a fun-filled yet inexpensive vacation for your family.


Plan your trip near a state or national park/monument.  Most offer a flat admission price.  That admission includes access to all the visitor centers, information, hiking trails, guided tours, amphitheater programs, and sights.  Some parks don't charge any fee at all!  Our choice, this year, was Rocky Mountain National Park in Colorado.  The admission price is $20 per carload, and that is good for one week.  Also, certain days of the year the National Park Service has free admission days.  Check this link for days:  http://www.nps.gov/findapark/feefreeparks.htm  Other parks we visited were Capulin Volcano National Monument and the Great Sand Dunes. 


Rent something with a full kitchen and cook all your own meals.  See below on how to pack/take food.  Take a pyrex measuring cup and some cheap measuring spoons, just to be sure (this is what's usually missing when we rent). 


Consider renting a townhome, cabin, or condo during the off season at a resort.  For example, in Frisco/Dillon, Colorado (near many ski resorts), you can rent a luxury condo for as little as $149/night.  Durango, near Purgatory Ski Resort and Mesa Verde National Park, has condos for as low as $105 a night.   If it's normally a summer resort, consider going in the winter and vice versa.  Off-season rental prices can be as much as half or more off the usual price. 


Pack as much of your own food as possible.  This may sound daunting, but it's actually fairly easy.  I make sure that anything we rent has a grill and/or an oven.  I plan meals ahead, make a menu, and then freeze almost everything.  Examples of freezable items are:  Boneless/skinless Chicken breasts, hamburger meat, hot dogs, steaks, lunch meat, cheese, butter, and bacon.  I even freeze milk and use it as my major chunk of ice in the ice chest (when it is thawed shake the milk for 1 minute continuously to remix if it separates).  We pack the frozen items into an ice chest, pack it full of ice, and by the time we arrive, some items are partially thawed and ready to be placed in the refrigerator to thaw further. 


For side dishes, I usually take 5 lbs. of potatoes, cans of baked beans, packets of rice/noodle side dishes, canned vegetables, and I usually also pack salt, pepper, sugar, and my own coffee and powdered creamer. 


Hoard packets or small bottles of condiments to take with you.  Jif makes single serving packets of peanut butter that are excellent to take on hikes.   See if a local restaurant would be willing to sell you a few packets of individual jellies to take, as well. 


Pack and take nonperishables such as:  Granola bars, Pop-Tarts, trail mix, peanut butter crackers, bottled water (some local water tastes icky), Capri sun, canned soda, chips, pretzels, and any other snacks you might want.  Think ahead:  If you're tempted to buy it at a convenience store on the way, pack it beforehand and save yourself a ton of money.  Homemade Chex mix tastes just as good, if not better, than Chex mix from a convenience store.  Buy whole packages of candy bars for what you'd pay for one on the road. 


Buy perishables and other unpackable items at  a store just outside the area where you will be staying.  Grocery stores near resorts and tourist attractions tend to be more expensive than in outlying cities, so stop for your perishables before you get too close.  Also, I am an avid couponer, so in the weeks before we go on vacation, I start using my coupons to get items I know we'll need for our trip.  I also keep coupons for perishables that I know we'll need when we arrive.  


On our way to and from, we stay in hotels that offer a free meal of some sort.  Usually breakfast.  Our favorite is Holiday Inn Express.  They offer a free continental breakfast that includes bacon and eggs, biscuits and gravy, sausage, toast, bagels, cinnamon rolls, fresh coffee, oatmeal, and fresh fruit.  Indulging in this can save you a significant amount, as even a run to McDonald's can be $20 or more.  Another place where we stayed offered continental meals for all 3 meals.  It's not gourmet, but it's not half bad, it's free, and it fills you up. 


Save those discount food coupons you get in the mail for places like Arby's, Sonic, A&W, Taco Bell, etc.  Use those if you must stop for food or hit the dollar menu.  

Pack picnic lunches when you go out.  PBJ, lunch meat, bread, chips, and a couple of drinks are all you need for a quick lunch without spending a ton of money.


Redeem any points from websites, credit cards, etc.  I use Swagbucks.  I make purchases and web searches through them and earn points.  I then redeem my points for gift cards.  My favorites are the Walmart E-Gift cards.  You can print out the gift card, take it to Walmart, and use it just like a regular gift card (instructions are on the bottom of the printout).   I used my Walmart gift cards to buy a good portion of the perishables we bought when we got there.   Hubster has an American Express card that he uses for business, and at vacation time he redeems his points, as well.  His favorites are the American Express gift cards.  We use those toward the end of vacation when we want to treat ourselves to eating out once or twice. 


Know your destination.  Do web searches to see what local attractions are in your area and what you can see/do for free.  There might be concerts or plays in the park,  city museums, city or state parks, hot springs, waterfalls, interesting rock formations, festivals, and other things going on that can be extremely fun.  The experiences are what you will remember.  

Be sure to stop at local visitor centers and check for coupon books.  These may be attached to maps of the area, or be on the backside of flyers and pamphlets that are usually in a cubby nearby.  We've found coupons for half off admissions, buy 2 get 1 free admission, percentage off at restaurants and other attractions.  Also, if you will be visiting something specific, check their website to see if they either offer coupons or discounts for purchasing tickets in advance.  


We drive and pack everything into a regular family car.  If you are pressed for space, devote your space to taking food.  If you are going to be gone for a week, pack enough clothes for about 4 days, then pack enough laundry soap and fabric softener sheets to do a couple of loads of laundry.  Some of the cabins we rent have a washer/dryer in them.  Other times, there's a laundromat nearby.  If you wear clothing only slightly, and it's not sweaty or smelly, then hang it up and wear it again.  Don't pack full-size cosmetics or shampoo/conditioner.  Most rental places also usually have a hair dryer available, so it's not necessary to pack that. 


Skip souvenirs; take pictures instead.  Our one indulgence is T-shirts because we wear them until they're worn out.  Each year we each buy one souvenir T-shirt .  If you want proof you visited something, consider stopping and taking a photo of yourself or your kids near the sign announcing the park, state, or sight.  Hang onto maps, ticket stubs, and pamphlets.  These make fun additions to scrapbooks. 


Consider keeping a diary while you travel.  If you are driving, note gas prices in various towns, interesting sights, places where you might get lost, funny things you, your spouse, or your kids do/say.  Note if you stop somewhere to eat, what you had, and the prices.  This may not seem important, but it can help significantly on your return trip and helps you remember why you took that photo of that goofy looking scarecrow in a field. 


Take tons of pictures!  Most cameras are digital now and can be downloaded to a computer.  Use free software to edit your photos, such as Picasa, GIMP, or IrfanView, then upload to some place such as Snapfish, Shutterfly, MyPublisher, or even local places such as Walgreen's.  Before you go, sign up for e-mail newsletters from photo processing places, and they will often send you coupons/discount codes for freebies.  Walgreen's often has a coupon for a free photo collage or 8 x 10.  Get free photo books, mugs, photo magnets, etc., and use those for gifts for grandparents, family, and friends.   I use interesting photographs, turn them into black-and-white, and hang them for decorations in our home. 


Find crazy, out-of-the way places along your route to visit and counteract boredom.  In Kansas, there are old salt mines that are now used for storage of movie archives, called the Kansas Underground Salt Museum.  http://underkansas.org/   There are hundreds of wind farms with huge wind turbines.  Us this as a teaching opportunity to learn about alternative energy sources.  When we come home, we usually journey through the panhandle of Oklahoma.  There is an area called No Mans Land that was at the heart of the Dust Bowl Era, and there are hundreds of abandoned homes on the prairie that make gorgeous photos and have an interesting tale to tell.  There are the Gloss Mountains, which are Oklahoma's own version of the painted desert.  They look like they are covered in sparkly, broken glass because of selenite in the soil.  http://www.travelok.com/listings/view.profile/id.3030


Your vacation can be an adventure and vastly more entertaining than feeling like you have to go to a resort or some place touristy.  You and your kids (if you have them) will long remember the hours spent hiking, learning about wildlife, and discovering interesting rock formations much more than how much money was spent.   These are memories that will last a lifetime. 

Monday, January 7, 2013

Crackle Glass Pebble Pendants - Simple Gifts

This is one of those crafts that you make, and it's very gratifying.  These pendants are so pretty, and they are so versatile that they can easily become your favorite accessory.  I made several that were just clear glass, and the people who received them as gifts immediately said they were their go-to item when they needed a simple but elegant accessory. 

These are made with glass pebbles that are found in the floral and decorating department at places like Dollar Tree, Hobby Lobby, and Michaels.  You can find several colors to accessorize your outfits, represent a birth month, or they can look festive and fun for an upcoming holiday.  

Bake them in the oven, shock them into cracking with ice water, glue on a bail, and poof you're done!  See the specific instructions below.  Now have some fun! 

Here's how to make them.  

Crackle Glass Pebble Pendants
  • Glass pebbles (I do many at a time so that I have them ready made)
  • Wire glue-on bails (instructions on how to make these HERE)
  • E6000 glue or Super Glue
  • Chain, ribbon, or leather for necklace 
  • Bowl of ice water 
  • Cookie sheet or aluminum pan 
  • Towel 

INSTRUCTIONS:  Place the glass pebbles in a pan in a single layer.  I do several at a time to save on energy and to make sure I have them ready for future crafts.  Place the glass pebbles in the oven, and turn it to 500 degrees.  Bake for 15-20 minutes.  Have ice water ready.  When pebbles come out of the oven, immediately dump them into the ice water.  They will sizzle, bubble, and some may even break, but the rest will begin to crackle.  Leave in the water for about 5-10 minutes, to allow pebbles to cool completely and finish crackling process.  Remove from water and drain on a towel. 

When ready to make, flip pebble over, and glue on one bail using E6000 glue, centering so pendant will hang evenly. 
Allow to dry/cure for 4 hours, preferably 24 hours.  Flip over and add necklace, then wear.  These are adorable as short pendants strung on a ribbon choker, or worn as a long statement necklace.  


Monday, December 31, 2012

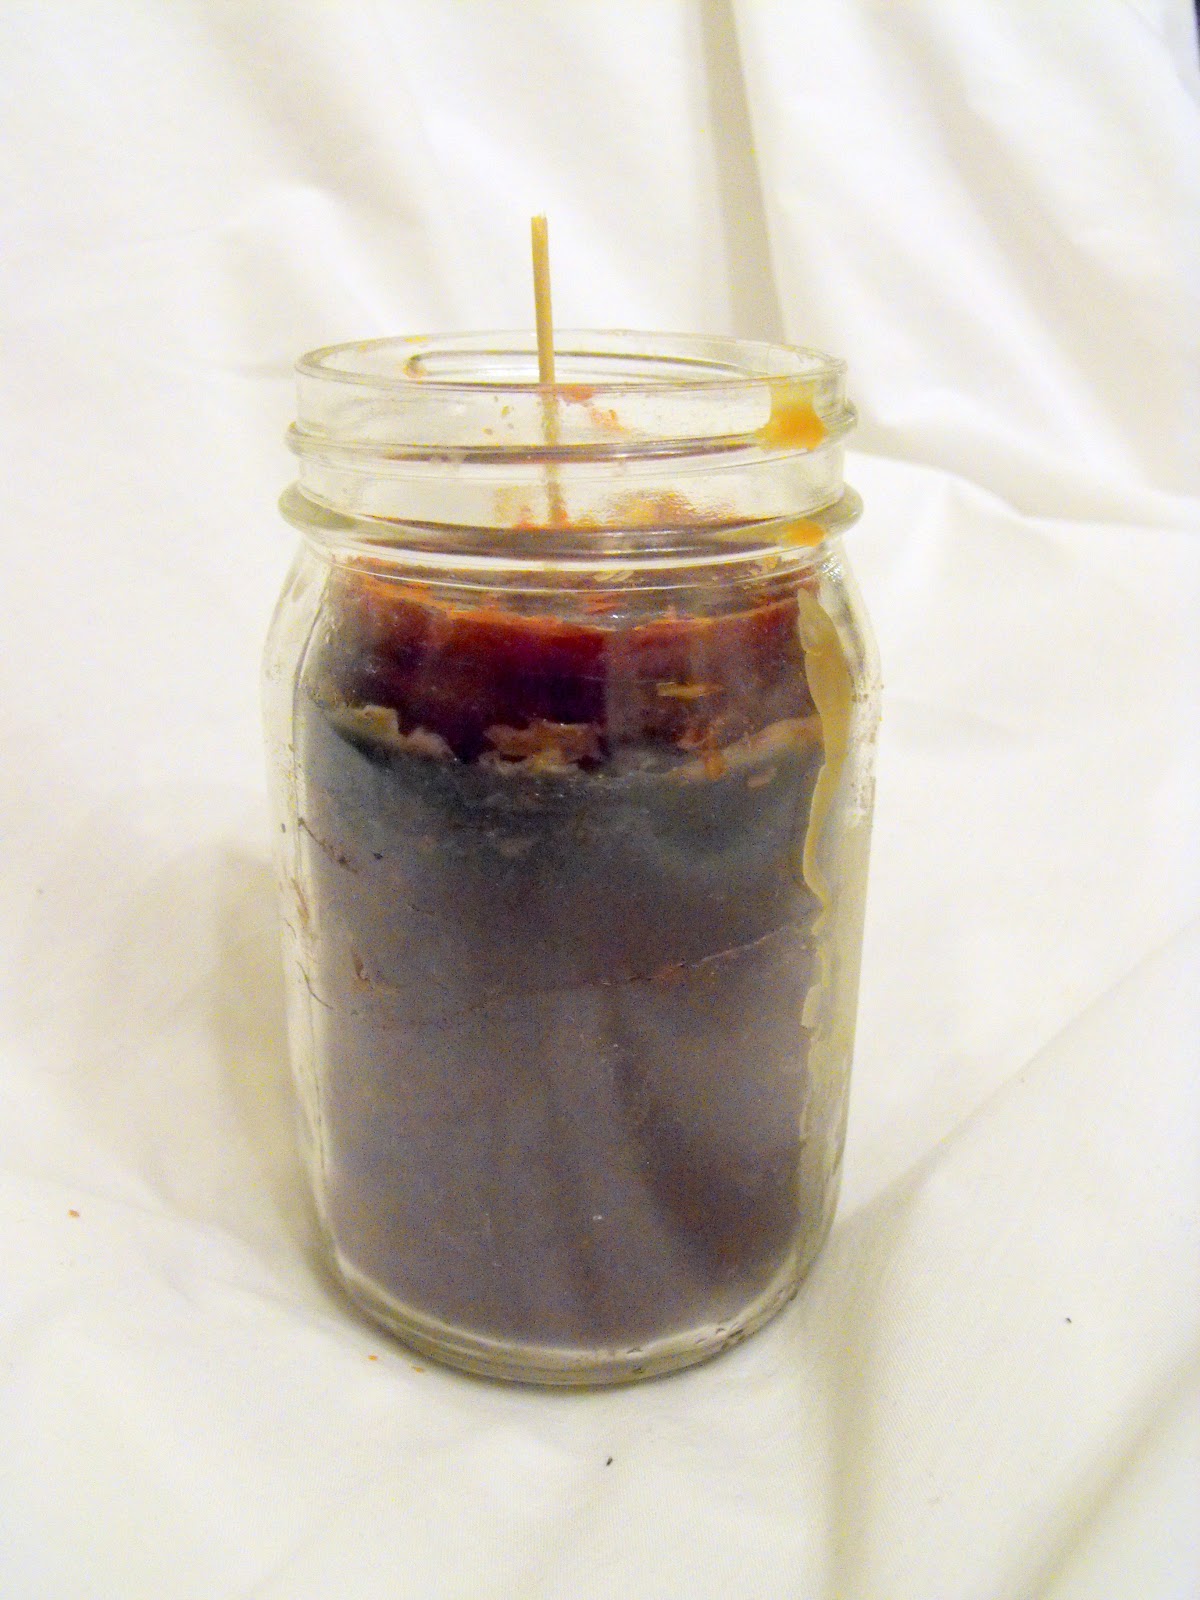
Recycle Used Wax Melts/Tarts into a Candle

If you've joined the craze for the wax warmers such as Scentsy or Pink Zebra or even the ones they have at Walmart, you have probably found scents you love.  However, after the wax scent dissipates, you want to change out the wax, but it seems a waste to just toss it out. 

This is an easy way to reuse the wax, and, believe it or not, the scent is still very much there once it burns.  The great thing about making these candles is that you get a slightly different scent as each layer burns through, and oftentimes it makes interesting scent combinations in the process.

I have different jars started for different scents.  I have one jar that is for the woodsy/spicy/kitchen scents such as Mountain Lodge, pumpkin pie, cinnamon spice, etc., and another that is for flowery/citrusy scents such as lavender, fresh cut grass, lemon, etc.  You can make as many or as few as you want, or even just have one jar into which everything gets dumped.  Whatever you choose, it's a great way to reuse the wax!

To make these you will need:
1 empty jar that is relatively heat safe (a Mason jar is perfect)
1 premade wick with base (I got mine at Hobby Lobby $2.99 for 5 click HERE to see)
Some type of adhesive, such as E6000, Super Glue, etc.
Melted wax
Pen, pencil, or dowel to hold the wick in place and steady while the jar is being filled.

Clean the jar and make sure it is dried.  Put a dab of adhesive on the bottom of the metal premade wick and poke it down into the jar, centering it, and then use a long object to press it to the bottom of the jar to make sure it's adhered.  

Once the wick has set, take the dowel, pencil, or pen, and wind the wick around it a couple of times until the dowel sits flush on top of the jar.  This will hold the wick centered until the jar is filled.  Next, begin pouring the melted wax.  

It's not necessary to do this all at once.  You can stick the jar in an out of the way spot and add to it whenever you change out wax in your warmer or if you've come to the end of a candle and need to pour off the remaining melted wax.  Add to this layer by layer.  

When the wax is to approximately the bottom of the threads on the jar, cut the wick off and trim to approximately 1/2 inch in length.  Now it's ready to use! (The photo below is of another candle made this way with darker wax.)


Monday, December 24, 2012

DIY Ruffled Scarf - Simple Gifts


I love scarves, particularly the ones that that are dressy/frilly.  I also love infinity scarves.  No worrying about how to do some fancy tie, or what do you do with the ends, etc.  

I was in Hobby Lobby recently and saw this ruffled fabric.  I knew I wanted to use it to make scarves.  It is a pre-ruffled fabric that is light and airy.  They had white, black, turquoise, yellow, and hot pink.  I bought 1 yard each of the black and hot pink.  The fabric was 58 inches wide.  If you are lucky, you may be able to find it in a wider width.  The wider the better!  Also, how you make your scarf will depend on the direction in which the ruffles run.  For the fabric I bought, the ruffles ran across the width of the fabric.  Had the ruffles run the length of the fabric, I would have had to adjust how much I bought. 

For the first scarf, I decided to make it an infinity or circle scarf. I decided to make it 12 inches wide, with the length being 58 inches.  I used a cutting board and rotary cutter, as I found that it was necessary to use something very sharp to cut the fabric.  It tends to slip.  Using 12 inches per scarf, I was able to cut three scarves.  

Trim any weird edges or severed ruffles.  Because this is a knit fabric, it is not necessary to hem it or finish the edges. You'll want to watch as you cut so that you can flip the ruffles back away from the cutting edge. 

Once I had the scarf cut that I was going to use for an infinity scarf, I put the short ends together and pinned them face-to-face. I then sewed across these edges in a straight line. 
That's it!  Turn the scarf right side out.  You now have an infinity or circle scarf that is approximately 57 inches in length and can be worn long or doubled for more of a cowl look.  It can also be pulled up over your head as a hood or headscarf in case of bad weather. 

Don't like infinity scarves?  Not to worry.  The selvage edge of the fabric has finished ends for the ruffles.  You can leave the fabric as is, trim up the long edges, and wear it as a tie type scarf! 

Very easy, very chic, and very afforable!  The fabric I purchased was $10.99, and I had a 40% off coupon for Hobby Lobby.  So the cost was approximately $2.20 cents per scarf!

Monday, December 3, 2012

Homemade Decorated Mugs - Simple Gifts

Homemade decorated Sharpie mugs are so much fun!  I made this one while I was waiting for my coffee to brew.  Mustaches are popular right now, and they make for a whimsical design added to a coffee mug.  Everyone looks more debonair with a mustache, right? 

To make this you will need: 
1 white coffee mug (I got mine at Dollar Tree)
Sharpie markers in your choice of colors
Cookie Sheet 

Oven temperature and time:  350 degrees for 30 minutes.

Draw your design on your mug.  If you are not steady handed, there are numerous printable templates that you can cut out and tape onto the mug, then color in.  I did my design free-handed.  It's a little lop sided, but sometimes mustaches are, too.  

Place mug(s) on a cookie sheet and place them in the oven.  Cook at 350 degrees for 30 minutes.  I leave my mugs in the oven and allow them to cool down with the oven.  Remember these mugs will be VERY hot and will be very sensitive to temperature changes, so it's best to let them cool completely before handling them. 

Once baked and cooled, the designs will become colorfast.   It is recommended to hand wash the mug, rather than putting it in a dishwasher, as most dishwasher soap contains a mild abrasive and can eventually erode the design. 

I have seen so many cute designs for these mugs.  One was a his and her that had half of a heart on one mug and the other half of the heart on the other mug.  You can write poetry, bible verses, or other inspirational sayings on your mugs.  I saw another where a funny nose shape was drawn on the bottom of the mug so that it looked like a plain white mug, but then turned up for a drink, the funny nose showed. 

Because Sharpies come in numerous colors, your designs can go from simple to elaborate.  HERE is a blog post from Pearls Poppies Pinkies Up showing more elaborate designs.  I've seen some that were goofy to some that were artistically elaborate.  For a truly elaborate design see post HERE from the official Sharpie Marker blog. 

Once your mug is designed, baked, and cooled, you can now either give it as an individual gift or fill it with goodies, wrap it in clear plastic, and tie with a bow.  Sharpie marker painted cups are a simple, unique gift that the receiver can appreciate every time they pour themselves a cup of coffee or enjoy a cup of tea. 

Monday, November 26, 2012

Refrigerator Magnets or Necklace - Simple Gifts

So you're looking for something fun to make that's easy, unique, and can be personalized.  How about refrigerator magnets from glass pebbles?!  The glass pebbles can be purchased at Dollar Tree for $1.00 per bag for 14 oz., which is a lot of pebbles.  You might even have a few of these left over from prior craft projects, such as the hardware store jewelry from a prior post, and this is a great way to use up the remaining pebbles.

These can be personalized with funny sayings, photos, scrapbook paper, or definitions from an old dictionary.  Above is a collection of magnets featuring Mae West, two from a scrapbook paper collection, one photo of my son sitting in my father's lap, and one from the peace sign collection.  

Glue a magnet to the back for refrigerator magnets, or glue a bail to the back of a finished piece and string it on a chain to wear as a necklace pendant.  

SUPPLIES: 
  • Glass pebbles
  • Photos, scrapbook paper, typed sayings, or photos from a magazine.
  • Clear Tacky Glue craft glue such as this:  Duncan 239396 Aleenes Quick Dry in. Tacky in. Glue-4 Ounce (Google Affiliate Ad)
  • Mod Podge
  • Paintbrush or sponge applicator 
  • Packing tape (to seal items that are not color fast)
  • Glue-on magnets (You can use old magnets from business cards and calendars, but they must be a strong magnet, otherwise they will not hold the weight of the glass pebble.)

Pick out the photos or pictures you want to use.  Check how they look by placing the glass pebble over the photo.  The glass tends to act as a lens and magnify the picture a bit.  


 The flower on this chair is very pretty and makes a great focal point!


 Ooooohhhh, who lives in a pineapple under the sea?


The pattern on this shirt is very pretty and would make a wonderful collage of fall themed magnets or a pretty pendant! 

Once you have determined which photos look best, cut out a small portion of the item, leaving enough so that a bit sticks out on the side of the glass. 

Turn your glass pebbles over and coat them with a small bit of the clear tacky glue.  


If you are using photos or other printable items that have ink that would smear or bleed, now is the time to seal those between two pieces of packing tape. These are small photos of family members I printed on my printer and needed to seal so that the ink wouldn't bleed. 
Once the pebble is coated with glue, press it glue side down onto the face of the photo or item.  Press hard so that the glue spreads out and adheres to the entire photo.  Make sure you press firmly enough that there are no bubbles in the glue.  


Once adhered appropriately, flip these over, glass side down, and allow to dry for several hours.  Once completely dry, use scissors to trim away the excess paper.  Using a sponge applicator or paintbrush, apply a couple of thin coats of Mod Podge over the backs of the pebbles, allowing each coat to dry thoroughly.  Several thin coats are better than one large coat of Mod Podge.  Otherwise, strange things happen to the paper once it's very wet. Once dry, glue a magnet to the back.
To turn one of these into a pendant, skip the magnet and instead spray the back of the piece with clear spray paint to provide a waterproof finish.  Unfortunately, Mod Podge is water soluble, so if you sweat and it's next to your skin, the Mod Podge will dissolve.  So a coat or two of clear spray paint will seal this.  Once completely dry, adhere a glue-on bail to the back of the pendant, allow it to set, and string on a pretty chain!


See the photo above of the magazine page with the woman holding the dog.  The pendant above is made from the pattern on the chair in the photo!