Search

Powered by Blogger.

Networked Blogs

Showing posts with label easy. Show all posts

Wednesday, February 20, 2013

Tomato Basil Parmesan Soup

A couple of days ago, I was craving soup.  I love cheese soups, but unfortunately I'm the only one in my household who does like them, so I usually share whatever I make with my mom.  Tomato Basil Parmesan soup filled the bill.  

It does take a bit of time to make, but the payoff is worth it!  It's spicy.  It's creamy.  It's tomatoey.  It's yummy, and it is filling!  What's not to like?  Plus, it makes a ton of soup, so there is plenty to eat and plenty to share.  Serve this with an antipasto side, such as olives and cheese, plus a crusty bread or just good old-fashioned crackers.  


Tomato Basil Parmesan Soup

 ½ stick butter

1 cup minced onion (about 1 medium onion)

1 cup chopped celery (about 4 stalks)

1 cup chopped carrots

2 cans (14 to 14.5 oz.) diced tomatoes, undrained

3 cups chicken broth or reconstituted bouillon

1 teaspoon dried oregano

1  Tablespoon dried basil

1 bay leaf

2 cans cream of chicken soup

1 can 12 oz. can evaporated milk

1 cup parmesan cheese     

Salt and pepper to taste


In very large sauce pan, melt butter over medium-low heat.  Add onion, celery, and carrots and allow to cook until onions are translucent.  Increase heat and add tomatoes, broth, oregano, basil, and bay leaf.  Cover, bring to boil, then reduce heat and simmer for 30 minutes.  Remove lid and add cream of chicken soup.  Blend well.  Add milk and blend.  Add parmesan cheese and blend.  Cover, reduce heat to low and allow to heat through for approximately 5 minutes.  Salt and pepper to taste.


Tuesday, February 19, 2013

Easy Spicy Baked Chicken

Spicy baked chicken is a very versatile dish and one that is so easy to make it should be a sin.   We make this in large batches and then store it and use it throughout the week for both hot and cold dishes.  The first night we usually eat it with rice, potatoes, and a salad or other vegetables.  After that, we may slice it into sandwiches, reheat it and eat it with onions and peppers for fajitas, toss it with greens for an easy salad, or reheat it for a quick hot meal.  

We do this on nights when it's crazy around here and want a simple, hearty meal that can be reheated as needed. We work such varied schedules that many times we eat at different times.  By making this dish, it's a way that we can make sure we all have a nice meal no matter what time we arrive home.  I make my own all-purpose spicy seasoning mix, and combine this with butter or olive oil for a savory seasoning that comes out just right.  The chicken falls apart when it comes out of the oven, and there will also be a savory au jus when baking is finished that is a wonderful seasoning for a baked potato, rice, or noodles.

Easy Spicy Baked Chicken
3-4 boneless skinless chicken breasts (or as many as you want), cut into 2 inch wide strips 
My all-purpose seasoning (recipe HERE) or seasoned salt plus ground black pepper
Butter or olive oil 

Spray a large baking pan with nonstick cook spray.  Coat both sides of chicken strips with seasoning.  Place in pan.  Either dot with 1/2 teaspoon spots of butter or drizzle with olive oil.  Cover pan with foil.  Place in 350 degree oven and bake for 1 hour to 1 hour 15 minutes.  


Tuesday, January 22, 2013

Easy Broccoli Cheese Soup

I love broccoli cheese soup.  It's warm, it's comforting, it's tasty, and it makes a great lunch.  I have seen so many recipes that call for an elaborate cooking process for making this yummy soup.  Upon examining the ingredients, I discovered that it was a cream soup base with broccoli, cheese, and other spices added in.  It didn't take me long to figure out there was an easier way!  So here it is.  My "recipe" for easy broccoli cheese soup. 

And it has only two pre-packaged ingredients! Actually three if you include the milk. 

Here's how it you make it. You use the two items shown above. Yes, that's really it!  It's so easy, and it tastes wonderful. 

EASY BROCCOLI CHEESE SOUP
1 box frozen broccoli and cheese sauce (10 oz.)
1 can cream of chicken soup (10 oz.) 
1 can milk 
Milk to thin to desired consistency 

Microwave broccoli and cheese sauce as directed on package.  While that is cooking, in a medium saucepan over low heat, begin preparing cream of chicken soup.  I recommend using milk because water will make the cheese and cream separate.  Whisk soup in sauce pan until thoroughly mixed.  Once broccoli and cheese are finished cooking, open the plastic package and add broccoli and cheese sauce to soup.  Stir thoroughly to combine.  Thin with more milk to desired consistency.  Serve with bacon bits, fresh ground pepper, salt, and crusty bread. 

If you would like to make this a little more homemade tasting, prior to making soup, you can sautee about 1 tablespoon minced onion in butter.  Then add soup and prepare as usual. 

That is it.  The easiest broccoli-cheese soup you will ever make!


Thursday, January 17, 2013

Tuna Croquettes - Broke Food

While tuna croquettes are listed as today's broke food, they are secretly one of my favorite things to eat.  Most people know salmon croquettes, but if you're really trying to save, croquettes made with tuna are just the ticket.  

I learned this recipe from my late mother-in-law, Judy, and it's been a favorite of ours ever since.  Most people have tuna in their cupboards, and oftentimes if you match coupons with sales, you can get tuna for a great price.  It keeps well, and it's versatile.  

These also make great mock filet-o-fish sandwiches.  Save a patty, and the next day heat in the microwave and serve with lettuce and tartar sauce as a sandwich. 

The recipe below is for 1-2 people.  If you need to feed more people, double or triple the recipe to suit your needs.  Now, on with the recipe! 

Tuna Croquettes (Makes 2-3)
One 2.6 oz. pouch of tuna (or an equivalent size can), drained 
1/2 cup crushed saltine crackers or bread crumbs
1 egg, beaten 
1-2 tablespoons finely minced onion or 1-2 teaspoons dried minced onion 
Salt and pepper

Combine all ingredients.  Allow to rest for about 10 minutes so the crumbs soften a bit.  Form into patties and fry in oil over medium-high heat.  Serve with tartar sauce or cocktail sauce (recipes below). This will make 2 large patties, 3 medium patties, or 4 very small patties.

Homemade Tartar Sauce
1/4 cup mayonnaise 
1 tablespoon sweet or dill relish
Dash onion powder 
Salt and pepper to taste 

Combine all ingredients and serve with fish.  My very first job was in a local fish house restaurant, and this was how they made their tartar sauce and their cocktail sauce.

Homemade Cocktail Sauce
1 cup ketchup
1/2 to 1 teaspoon Worcestershire sauce (to taste)
dash of garlic powder 
dash of Tabasco hot sauce

Mix all ingredients and chill before serving. 


Tuesday, January 15, 2013

Asian Chicken Ramen - Creative Cooking

This is one of those recipes that is relatively inexpensive and makes a TON of food.  It's great to feed a lot of people, and the ingredients are flexible enough that you can make more of less of it  depending on your resources.  
We used to live in Colorado, and on more than one occasion, we would have a house full of people.  When that happened, I had certain go-to recipes that I knew would be tasty, filling, make large quantities, and were usually something that everyone would like.  Add a salad and drinks, and this is enough to feed a crowd. 

 Asian Chicken
4 pkgs. Ramen noodles
4 C. water
¼ C. soy sauce
1 tsp. crushed red pepper flakes (may omit)
2 (16 oz.) pkgs. mixed vegetables, preferrably Asian stirfry, but any will do
6 cups cooked chicken of your choice (can reduce to as little as 2 cups, if desired; 6 cups is a lot of chicken)

In very large pot bring 4 cups water to boil. Stir in seasoning packets from Ramen noodles, soy sauce, and pepper flakes. Add noodles. Cover and cook for 2 minutes. Do not drain noodles. Add veggies. Cover; cook until noodles and veggies are tender, 3-4 minutes. Stir in chicken. Makes almost 2 gallons.

HINT: To decrease the cost of this dish, you can decrease the chicken and add 2-3 scrambled, chopped up eggs.

Thursday, January 10, 2013

Easy Kitchen Cleanup while Cooking


Some friends and I were having a discussion recently about whether or not we like to cook.  A couple said they wouldn't mind cooking if it didn't make such a mess.  I piped up because one thing that I learned, when I was learning to cook, was how to clean as you go. 

Now, let's get one thing straight.  I... AM... A.. SLOB.  No ifs, ands, or buts.  I would rather do anything that clean, my house is a disaster, and a scatter bomb going off would be an improvement.  As someone once said, "A lazy person will find the fastest way to do something."  That would be me.  

However, one thing I'm weird about is my kitchen.  While there might be clutter around, the kitchen itself will be clean.  I cannot start cooking unless the kitchen is clean first.  Weird, huh? 
I told them my tips for cleaning as I go while I cook, and a friend suggested a blog post.  So here we go! 

Steps to Cleaning while Cooking: 
  • Put away any clean dishes in the dishwasher.
  • Empty the sink and counter spaces and put all dirty dishes in the dishwasher.
  • Plug the sink and squirt in a little dish soap.  Run the sink about half full of soapy water. 
  • As you cook and use bowls, utensils, etc., put them in either the sink or the dishwasher.
  • Hang a Walmart sack or trash sack over either a cabinet drawer or cabinet door to secure it.  Hang it near where you are cooking. Dump empty cans, packaging, or scraps in as you cook so that you are not moving back and forth between the trash can. 
  • Open any cans needed for a recipe.  Drain, if needed.
  • Save an empty can into which you can pour drippings from cooked meat, such as hamburger meat. Toss the can when contents are cool. 
  • Chop any veggies that need to be chopped.
  • Cut up and/or rinse any meat needed in the recipes. 
  • Use a spoon rest or folded up dampened paper towel on which to lay any utensils while you cook to prevent drips and spots.  
  • As you use something, put it either in the soapy water in the sink, or put larger items in the dishwasher.
  • When finished cooking and serving your meal, you can empty the sink and either place soaked items in the dishwasher or give them a quick scrub, rinse, and dry to put them away.  
  • Collect trash sack full of items and discard. 
  • Wipe down stove/oven, counters, let water out of sink and scour. 
You're done! 


Monday, January 7, 2013

Crackle Glass Pebble Pendants - Simple Gifts

This is one of those crafts that you make, and it's very gratifying.  These pendants are so pretty, and they are so versatile that they can easily become your favorite accessory.  I made several that were just clear glass, and the people who received them as gifts immediately said they were their go-to item when they needed a simple but elegant accessory. 

These are made with glass pebbles that are found in the floral and decorating department at places like Dollar Tree, Hobby Lobby, and Michaels.  You can find several colors to accessorize your outfits, represent a birth month, or they can look festive and fun for an upcoming holiday.  

Bake them in the oven, shock them into cracking with ice water, glue on a bail, and poof you're done!  See the specific instructions below.  Now have some fun! 

Here's how to make them.  

Crackle Glass Pebble Pendants
  • Glass pebbles (I do many at a time so that I have them ready made)
  • Wire glue-on bails (instructions on how to make these HERE)
  • E6000 glue or Super Glue
  • Chain, ribbon, or leather for necklace 
  • Bowl of ice water 
  • Cookie sheet or aluminum pan 
  • Towel 

INSTRUCTIONS:  Place the glass pebbles in a pan in a single layer.  I do several at a time to save on energy and to make sure I have them ready for future crafts.  Place the glass pebbles in the oven, and turn it to 500 degrees.  Bake for 15-20 minutes.  Have ice water ready.  When pebbles come out of the oven, immediately dump them into the ice water.  They will sizzle, bubble, and some may even break, but the rest will begin to crackle.  Leave in the water for about 5-10 minutes, to allow pebbles to cool completely and finish crackling process.  Remove from water and drain on a towel. 

When ready to make, flip pebble over, and glue on one bail using E6000 glue, centering so pendant will hang evenly. 
Allow to dry/cure for 4 hours, preferably 24 hours.  Flip over and add necklace, then wear.  These are adorable as short pendants strung on a ribbon choker, or worn as a long statement necklace.  


Friday, December 28, 2012

Easy Graham Cracker Coconut Snack Bars - Creative Cooking

This is one of those recipes that has been passed around our family.  It was originally invented by my Aunt Bertie Jo for Christmas candy.  The way it is made is like a snack bar; however, before it "sets up" you can form it into individual balls and roll it in nuts, powdered sugar, coconut, or even dip it in chocolate coating to form a truffle type candy.  

The recipe is really easy, it's addictive, it's delicious, and it's quick!  Why am I just now posting this?  Because I'm just getting around to making it.  It seems like Christmas sneaked up on me this year, so I'm just now making my favorite foods and snacks. 

Aunt Bertie Jo's Graham Cracker Coconut Snack Bars 
16 planks of graham crackers, crushed*  
1 can Eagle Brand milk 
2 cups shredded coconut 
1 quart pecan pieces

*1 plank is one of the solid rectangles of graham crackers that if you broke it on the scored lines  equals 4 individual crackers.  The total amount used usually equals around 2 plastic wrapped packages from a box of graham crackers 

Mix all ingredients in a bowl.  Then pour into a greased 9 x 13 pan and press flat.  Place in the refrigerator and allow to set up for approximately 1 hour.  Slice into 1 x 1 inch squares.  

Alternatively, before pressing this mixture into a pan, you can form it into small 1 inch balls, then roll in powdered sugar, crushed pecans, or coconut, and refrigerate.  If you're feeling really ambitious, form the 1 inch balls of this mixture then dip in candy coating such as CandiQuick. 

Tuesday, December 25, 2012

Crock Pot Bread Pudding with Kahlua Sauce


Bread pudding is such a rich, decadent, and sumptuous treat that it's hard to believe the ingredients are so simple.  I consider bread pudding to be a comfort food.  The sight of the chunks of browned bread along with the scents of vanilla and cinnamon make me think of warm kitchens, good food, and good times. 

I've seen this casserole called crock pot French toast.  Oh heck no!  We southern girls know that this is bread pudding!

Mix this up and put it on to cook before heading to work for a yummy dessert.  Or, if you want to something take for a crowd-pleasing pot luck dinner, put it on to cook at night, turn the crock on low, and in the morning you'll have bread pudding ready to serve.  The Kahlua sauce keeps well in the refrigerator and reheats easily.  Make extra sauce if you like it served over ice cream. 

Bread Pudding
1/2 loaf bread with pieces torn into chunks (the more stale it is, the better)
6 eggs
2 cups milk 
2 teaspoons cinnamon 
1 teaspoon vanilla 
2 tablespoons brown sugar (or 1 tablespoon white sugar and 1 tablespoon maple syrup)
1/2 cup pecan pieces (or raisins, if you prefer)

In large bowl mix eggs, milk, cinnamon, vanilla, and sugar.  Fold in bread.  Allow to sit or rest for 15 minutes.  Pour half of mixture into greased crock pot.  Add half of pecans.  Pour remaining mixture into crock pot and top with remaining pecans.  Turn crock pot on low and allow to cook for 6 hours, minimum. Approximately 15-20 minutes before serving, remove the lid from the crock pot and turn crock on high.  This will "brown" the top of the bread pudding.  When ready to serve, scoop out and top with Kahlua sauce (recipe below).  

Kahlua Sauce 
2 cups sugar
1/2 cup milk 
1/2 stick of butter 
1/2 teaspoon vanilla
1/2 cup Kahlua

In medium saucepan combine sugar, milk, butter, and vanilla.  Heat over medium heat, stirring continuously, until mixture begins to steam and bubbles form.  Add Kahlua, stirring rapidly, and heat through again to near boiling point.  Remove from heat and continue to stir rapidly until no bubbles remain in sauce.  Serve over warm bread pudding.  

For an extra treat, top bread pudding with a dollop of ice cream, then top all with the Kahlua sauce. It is divine!

Thursday, December 20, 2012

Beans and Franks - Broke Food

Ever have one of those days where you walk to the fridge, open it, there's nothing there... and then 20 minutes later you walk back and repeat the action?  As if somehow something appealing magically appeared during that 20 minute interval.  Then maybe you go to your pantry and do the same thing, and still find nothing?  This old-fashioned favorite might be the solution. 

This is definitely a comfort mood in addition to being broke food.  Plus, tell me you don't have the movie Something About Mary going through your head right now!  Beans and franks are fun, they're delicious, and best of all, they're easy to make and qualify as broke food. 

Beans and Franks 
2 16 oz. cans pork and beans
1 package hotdogs, franks, weenies, wieners, whatever you call them (about 6-8)
1/2  to 2/3 cup barbecue sauce, your choice
1 tablespoon brown sugar or maple syrup
1 tablespoon prepared mustard
1/2 medium onion, chopped, or 1 tablespoon minced dried onion (optional)

For the oven version of this, place all items in a casserole, combine, and cook at 350 degrees for 1 to 1-1/2 hours or until sauce thickens.

For the stovetop version, add all ingredients to a large saucepan.  Heat until bubbles form in mixture, then reduce heat to low, cover, and simmer for 15-20 minutes, stirring periodically to keep mixture from sticking. 

For the microwave version of this, place in a microwave safe casserole.  Cover and microwave on high for 15 minutes, stirring at 5 minute intervals or until heated through and mixture has "boiled down." 


Alternative Recipe 
2 14.5 to 16 oz. cans white beans, navy beans, or pinto beans (in a pinch), drained and rinsed
1/2 cup ketchup
1 to 1-1/2 tablespoons prepared mustard or spicy brown mustard
2 tablespoons brown sugar
1/2 teaspoon cider vinegar
1/2 teaspoon Worcestershire sauce
1/2 medium onion chopped/minced or 1-2 tablespoons minced dried onion
1 package hotdogs cut into medallions
salt and pepper to taste

Mix all ingredients and follow baking, stovetop, or microwave directions noted above.


Tuesday, December 18, 2012

Lemon Rosemary Chicken - Freezer to Crock Pot

This is the time of year where it seems like heavy meals abound.  There's the office party with prime rib or steak.  There's the blustery days with chili and stew.  Sometimes you're sick of heavy meals and just want something good, filling, but not too heavy.  Lemon Rosemary chicken is a wonderfully light meal that can easily be made in the crock pot.  The citrusy flavor is the perfect compliment to the rosemary.  This tastes great served with rice or served alongside a salad and crusty bread.  

I used chicken tenders in this recipe, but you can use boneless, skinless chicken breasts, or even a whole, cut up chicken to make this recipe.  If you use bone-in chicken, be sure to place it in the bottom of the crock pot, bone side up, so that the meat cooks through.  

Lemon Rosemary Chicken
1-1/2 to 2 pounds boneless skinless chicken breasts or tenders
1/2 C lemon juice 
1 teaspoon rosemary
1 Tablespoon vegetable oil or olive oil 
1 garlic clove, minced
1/4 teaspoon salt
1/4 teaspoon pepper

Lightly brown chicken in a nonstick pan or pan coated with nonstick cooking spray.  Place in bottom of 1 gallon zippered freezer bag.  Combine remaining ingredients and pour over chicken.  Remove air, seal, and then massage to distribute ingredients.  To cook in crock pot, either thaw in the refrigerator for 24 hours or place entire frozen contents of zippered bag into crock pot.  Cook on low 6-8 hours or high for 4-6 hours.  If cooking from frozen, increase cooking time by 1-2 hours. 


Thursday, December 13, 2012

Egg Drop Soup - Broke Food

Today's installment of broke food is just in time for the cold weather!  It's simple, filling, delicious, and best of all, it's inexpensive.  Have it by itself for a meal that is satisfying, or pair it with last week's broke food fried rice recipe, and you'll have enough to feed several people or have leftovers.  

Someone recently told me that I could make these recipes "richer" or have more ingredients in them.  I could, but that's not the point.  The point is to be able to make a meal with what you have on hand by using simple ingredients with just enough spices, additions, and creativity to make it feel like you're not scraping the bottom of the cupboard.   Egg Drop Soup also has just enough protein, in the form of the egg, to give it some substance and flavor. 

On a side note, I LOVE this soup if I've been sick.  It's wonderful for an upset tummy, and it's also very soothing if you've had a cold or the flu.  It just hits the spot in a satisfying way. 

Egg Drop Soup

16 oz (2 cups) chicken broth or prepared chicken bouillon (2 cubes bouillon to 2 cups water)
1 tablespoon soy sauce
A dash of garlic powder
1 egg, beaten  
2-3 green onions/scallions ( or 1 tablespoon chopped onion or 1 teaspoon dried minced onion)
Wire whisk
Optional: 1 teaspoon corn starch mixed with cold water (to thicken soup)* 

In a medium saucepan, bring broth or bouillon to a rolling boil.   Add soy sauce and dash of garlic powder.  Allow to cook for 1 minute and return to rolling boil.  Begin whisking the broth rapidly while pouring beaten egg into broth.  Whisk rapidly until egg forms cooked "strings."  Stop whisking and allow soup to return to a boil.  Add in onions and allow to cook for another minute or so, to combine flavors.  Thicken with cornstarch, if desired.  Serve hot.  Sample and then salt to taste.  Other seasonings to try are ground black pepper, a bit of ground/fresh ginger, or red pepper flakes. 

*Remember, when adding cornstarch to hot liquids, you must first add cold water to the corn starch and stir it well until it is dissolved.  Then pour it into your hot soup. Stir continuously until soup is desired thickness. 


Friday, December 7, 2012

The Best, Easiest Cheese Ball, Cheese Log, or Cheese Spread Ever!

I have been making this cheese ball for about 25 years because it is THAT good.  Plus, it's so easy to make, and it tastes fabulous.  Not only can it be made into a cheese ball, it can be a cheese log or, if left in it's softened state, can be used as a spread for tortilla pinwheel rollups!  

I've taken it to office parties, potluck dinners, or just made it because I like it!  Most people really love the flavors and are surprised to find out that the ingredients are so simple.  Here's the recipe!

EASY CHEESE BALL, CHEESE LOG, OR CHEESE SPREAD:

  • 1 8 oz brick of cream cheese, softened
  • Approximately 4-5 slices of deli sliced ham (If you buy the packages of Buddig Ham, those are perfect!)
  • 3-4 green onions chopped (use both the white part and the green tops after cleaning and trimming off root ends)
  • 1 Tablespoon soy sauce (packets of soy sauce from carryout are perfect for this!)
  • chopped nuts, parsley, or bacon bits for exterior if using as cheese ball or log roll
Place the softened cream cheese in a bowl.  

Add in the green onions, soy sauce, and chopped ham.  
Mix until all ingredients are blended thoroughly and mixture is smooth.  
Place mixture into the refrigerator and allow it to set up or harden again.  Once it's firm use oiled plastic wrap or wax paper and form into a ball.  Roll in dried parsley, chopped nuts, shredded cheddar cheese, or bacon bits.  Refrigerate until ready to serve.  

To make this into tortilla rollups, leave the mixture softened and spread onto large tortillas.  Do not slice yet.  Refrigerate until cheese firms up, then remove from the refrigerator and slice into pinwheels!
I'm going to apologize for these rollups.  I was in a major hurry, as my light was fading, and the flash has gone out on my camera!  They may look a bit pitiful, but they tasted great!

Tuesday, December 4, 2012

Ranch Crock Pot Pork Chops - Freezer to Crock Pot

Finding new ways to cook pork chops can be challenging.  A friend told me about this, and I just had to try it.  Ranch Crock Pot Pork Chops are a great way to cook pork tenderloins in the crock pot and have a savory gravy to serve over potatoes, rice, or on toast.  

When I was told about this, I had one of those forehead-slapping moments that was like, "Really?  Three ingredients?  Why didn't I think of that!"  The ingredients were so obvious.  I don't know why I hadn't put them together before.  Plus, just about anything with ranch is awesome. 

Without further adieu, here they are:  

RANCH CROCK POT PORK CHOPS
4-6 thick cut pork tenderloins or chops (I prefer tenderloins)
1 can cream of chicken soup
1 package powdered ranch dressing mix

Put the powdered ranch dressing mix in a gallon zippered bag.  Put the chops in the bag, and shake to coat the chops with the dressing mix.  Add the can of chicken soup and enough water to "wash out" the can.  Remove air from bag, seal, and then massage to distribute the ingredients.  When ready to use, remove frozen block from bag and place in crock pot.  Cook approximately 6-8 hours on low or 4-6 on high.  You might need to remove the chops and whisk the gravy with a wire whisk in case lumps have formed.  Serve over mashed potatoes, rice, or toast.  

If cooking immediately, just place chops in crock pot along with cream of chicken soup, and sprinkle dressing mix over the top.  Stir until blended then cook for 6-8 hours on low.  

The gravy that this makes is excellent, so if you want extra gravy, you might consider doubling up on the cream of chicken soup and ranch dressing mix.  Enjoy!


Tuesday, November 27, 2012

Chipotle Lime Chicken - Freezer to Crock Pot

Chipotle lime chicken is a zesty dish with bold flavors that compliment one another well.  Tomato sauce, cilantro, vegetables, and spices kick this up a notch beyond ordinary.  

Put this in the crock pot in the morning, and come home to a flavorful and satisfying meal without a lot of effort. 

Chipotle Lime Chicken

**This recipe makes two meals.  Cut ingredients in half to make just one recipe.**
8 boneless skinless chicken breasts 
Canadian/Montreal steak seasoning
2 cups diced onion
2 cups chopped celery
2 cups chopped carrots
2  14 oz. cans tomato sauce
1/2 cup lime juice
2 tbsp minced chipotle chiles in adobo sauce
4 garlic cloves
3 Tablespoons dried cilantro

Divide chicken breasts into two 1 gallon zippered freezer bags.  Season both sides of each chicken breast liberally with steak seasoning.  Add remaining ingredients, squeeze air from bags, and seal.  When ready to cook, place frozen chunk in crock pot and cook on high for 4-6 hours or low 8-9 hours.  Serve over rice or noodles.   

Friday, November 23, 2012

Freezer to Crock Pot - Smothered Pork Chops


Crock pot smothered pork chops are a nice change of pace from the usual fried or grilled pork chop.  These come out tender and fall apart (as evidenced by the photo!).  This is a flavorful recipe that brings out the flavor of the pork chops while providing a satisfying and savory gravy to serve over noodles or toast.   

This was part of a post showing make-ahead crock pot meals.  See the original post  HERE.

Smothered Pork Chops
3-4 boneless pork tenderloins/chops 
1 large onion, cut into rings
1 can cream of chicken or cream of mushroom soup
About 1 tablespoon Montreal/Canadian Steak seasoning 

4-6 peeled and sliced potatoes when ready to cook

Season pork tenderloins with steak seasoning, and layer with onions in 1 gallon zippered freezer bag.  Add cream soup and remainder of steak seasoning.  Squeeze air out of bag and seal.  Freeze.  When ready to cook peel and slice 4-6 potatoes and place them in the bottom of the crock pot.  Then place the entire block of frozen food on top of this in the crock pot and cook on high for 4-6 hours or low for 6-8 hours.   Serve over noodles or toast. 

Thursday, November 15, 2012

Broke Food - Microwave Scrambled Eggs with Veggies or Heuvos Rancheros


A couple of mornings ago, I was starving, and there wasn't a whole lot in the fridge that was ready to eat.  I hadn't been to the grocery store in a while, and it looked like it was going to be a couple of days before I could make a trip.  

I spotted a carton of eggs and some salsa and knew what I wanted.  I just didn't want to have to take the time to get out a bunch of pots and pans and get them dirty.  

Microwave to the rescue!  I quickly gathered my supplies, and within 5 minutes had a hearty breakfast that was flavorful, spicy, and easy. Normally, any self-respecting southern girl would gasp at not cooking your eggs in butter and a cast iron skillet.  However, I just needed to get to work and fast, without having to listen to a growling belly.  

On a side note, I know that most huevos rancheros are made with fried eggs sunny side up; however, since we're doing this quickly, we had all the components, just a slightly different technique.  

I don't care for tortillas in the morning (yes, I'm weird), so I usually pop a couple of slices of toast in the toaster while I'm microwaving the eggs.  And yes, that's a foam plate.  Did I mention I was in a hurry and didn't want to get dishes dirty?  Ha!   This is also a great way to use up those little tiny packets or containers of salsa you receive with fast food and stick in your fridge!

Microwave Scrambled Eggs with Veggies/Huevos Rancheros 
Pam or other oil
2 eggs
2 tablespoons of milk 
Salt and Pepper 

Spray the inside of a large coffee mug with Pam or lightly grease it with oil.  Crack the 2 eggs into the mug and add the milk, salt, and pepper.  Using a fork, scramble the eggs well.  Microwave on high for approximately 45 seconds.  Remove, stir eggs well, and return to microwave and cook for another 1 minute of time.  Remove the mug from the microwave and immediately dump eggs onto a plate.  Use a fork to break up and distribute scrambled eggs. 

For omelet style scrambled eggs, top with chopped onion, peppers, bits of bacon or ham, cheese, and other goodies.  Use what you have in the fridge.  Leftover stir fried veggies are great heated up and spooned over these eggs.

For huevos rancheros style, top the eggs with shredded cheese and spicy salsa.  Roll into flour tortilla or serve alongside buttered toast.  You could even add refried beans or chili, if you can stomach it first thing in the morning.  Otherwise, it also makes a great evening meal. 

There you have it!  Easy, quick, inexpensive, and satisfying! 

Monday, November 12, 2012

Wire Wrapped Glass Pebble Pendant - Easy Christmas Gift


Wire wrapped glass pendants are a fun and easy gift you can make with relatively inexpensive items.  The sloppier the design, the prettier it is, and despite how complicated they look, they're really easy to make.  They make beautiful gifts, and you can whip them out in just a few minutes once you get the hang of this.  

I'll give a list of items below, and then try to show step-by-step how it's done.  The only part I do not have pictures of is the actual placement of the wires simply because I needed two hands to hold everything in place and couldn't really take photos.  So here we go! 


Materials Needed 
**or **
  • Needle-nose pliers (may need to wrap the tips with tape if using on jewelry wire so the wire doesn't get scarred)
  • Wire Snips 
  • Tweezers 
  • Necklace chain, silk cord, leather cord, or ribbon, about 24 inches in length.
INSTRUCTIONS (Click on Photos for Larger views):
Cut two lengths of wire approximately 1 foot long.
Begin bending them in a loopy zigzag pattern, leaving tails on either end.  


(Photos show loopy wire and sizes of glass pebbles. )


Lay wires in a cross pattern, and center one pebble in the middle. 

This is the trickiest part of this whole thing, but it will be fine. The glass can be slippery!  

Begin folding the wires up and over the pebble, overlapping the wires, bending and smooshing them together.  The wires need to be enmeshed.  Form a cage around the stone.  Grab the pliers or tweezers and bend the wires around each other.  For example, bring a loop up through another and then bend it back over.  Leave two wires long at the top for use to make the bail later on.  If needed, use the loose ends for the bottom and side pieces to loop back through or snip off and use elsewhere.  Curl the ends of any loose wires, and tuck them in against the glass.  

Cut short lengths of wire from the spool and use to bridge a gap between two loops of wire if there is a space where the glass could "escape."  Again, curl the ends under, then twist the wire and tuck it snug against the glass (see photo below).  The piece is sticking out so that you could see how I passed the short wire piece between the two.  I curled it further and tucked in the pieces.

Once the wire is shaped around the glass the way that you like, it's time to make the bail at the top of the pendant.  

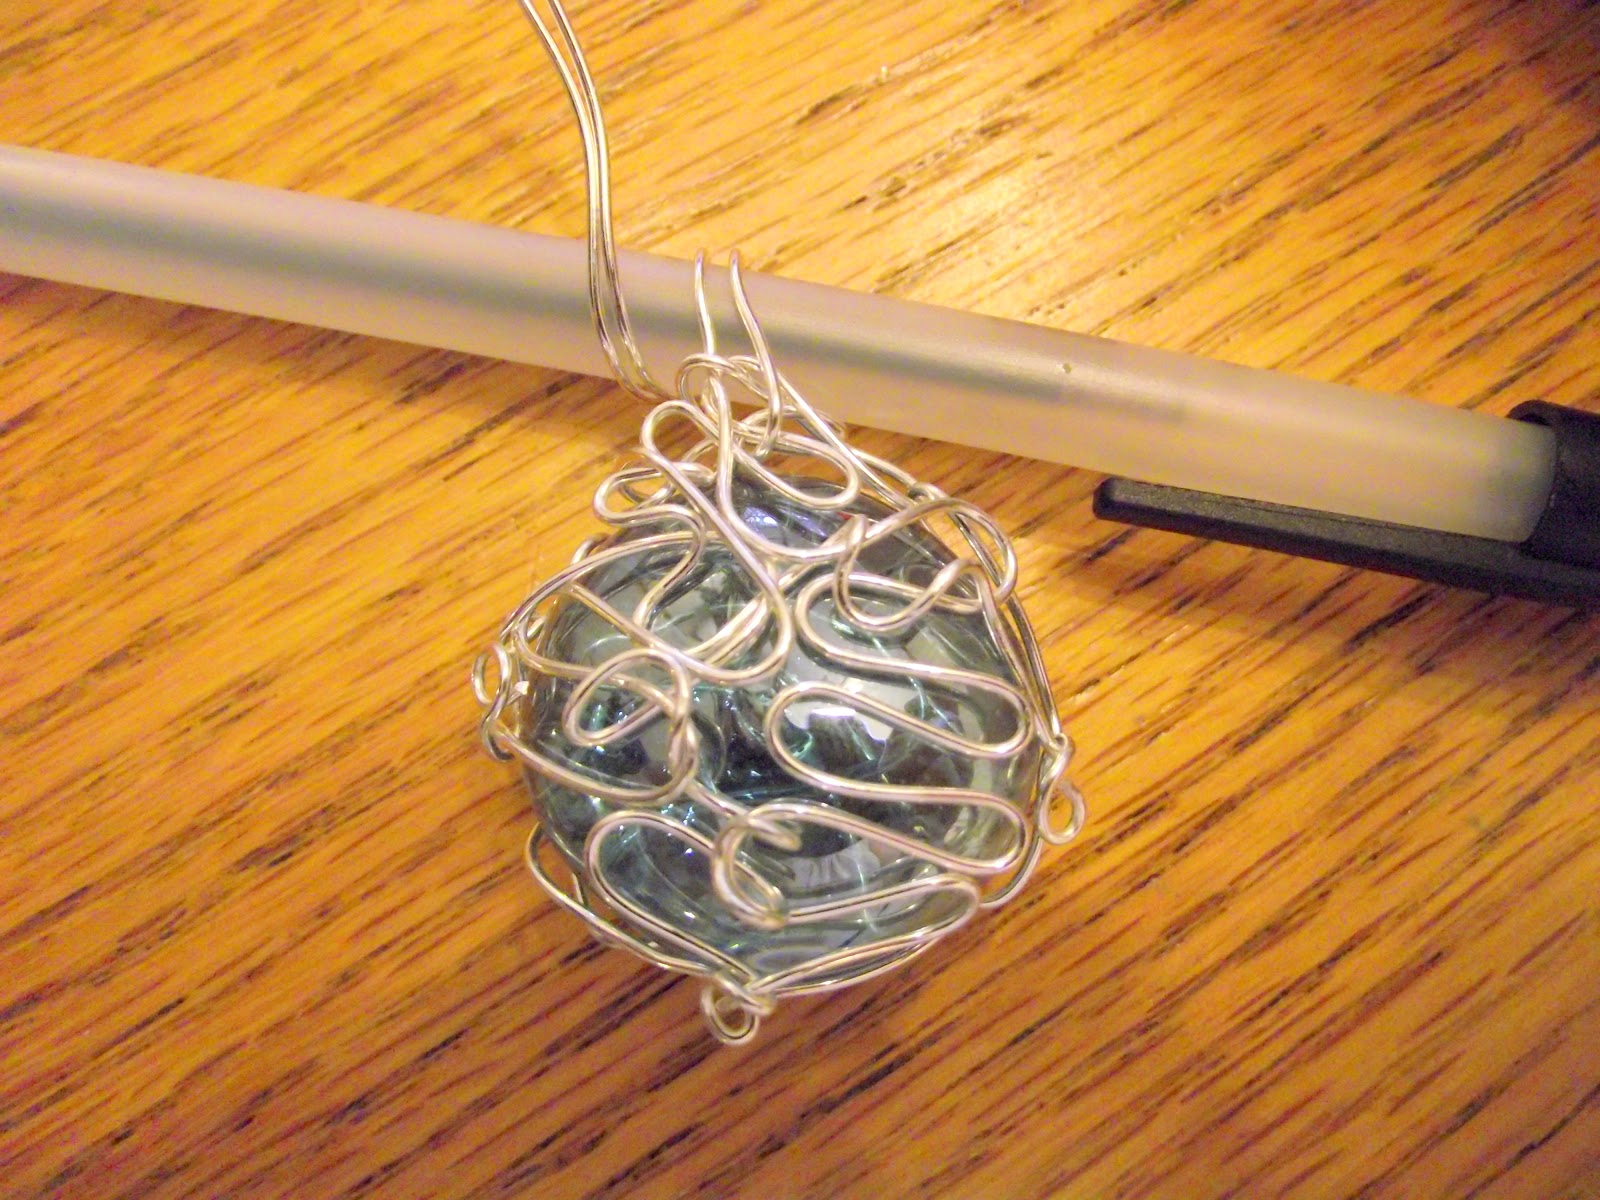
I used a ball-point pen and wrapped the two wires around it one full wrap.  I have exaggerated how the wires come off this so that you can see how they come back around.  You'll want the wire to be as close to the base as possible.  


With the pen still inside the wire loop, begin wrapping the two wires around the base in a concentric spiral fashion until all of the remaining wire has been used.  Curl ends of wire and tuck under the bottom of the bail.  Straighten and center bail as necessary. 

This doesn't have to be neat, just so long as it is held securely. 

If you feel this needs a little more security for the glass, use tiny dabs of E6000 glue on a toothpick.  Place it between the wire and the glass. A little E6000 goes a very long way.  Allow to dry/cure for approximately 24 hours before wearing.  

Another way to "tighten" wires is to put the pliers (or tweezers) in the middle of a piece of wire and twist slightly to form a crook.  See before and after photos below.  This takes up any excess slack in the wire and lends an artistic appearance. 

Suspend this from a chain, ribbon, silk cord, or strip of leather tied off.  These are very pretty, unique, and no two are alike.  

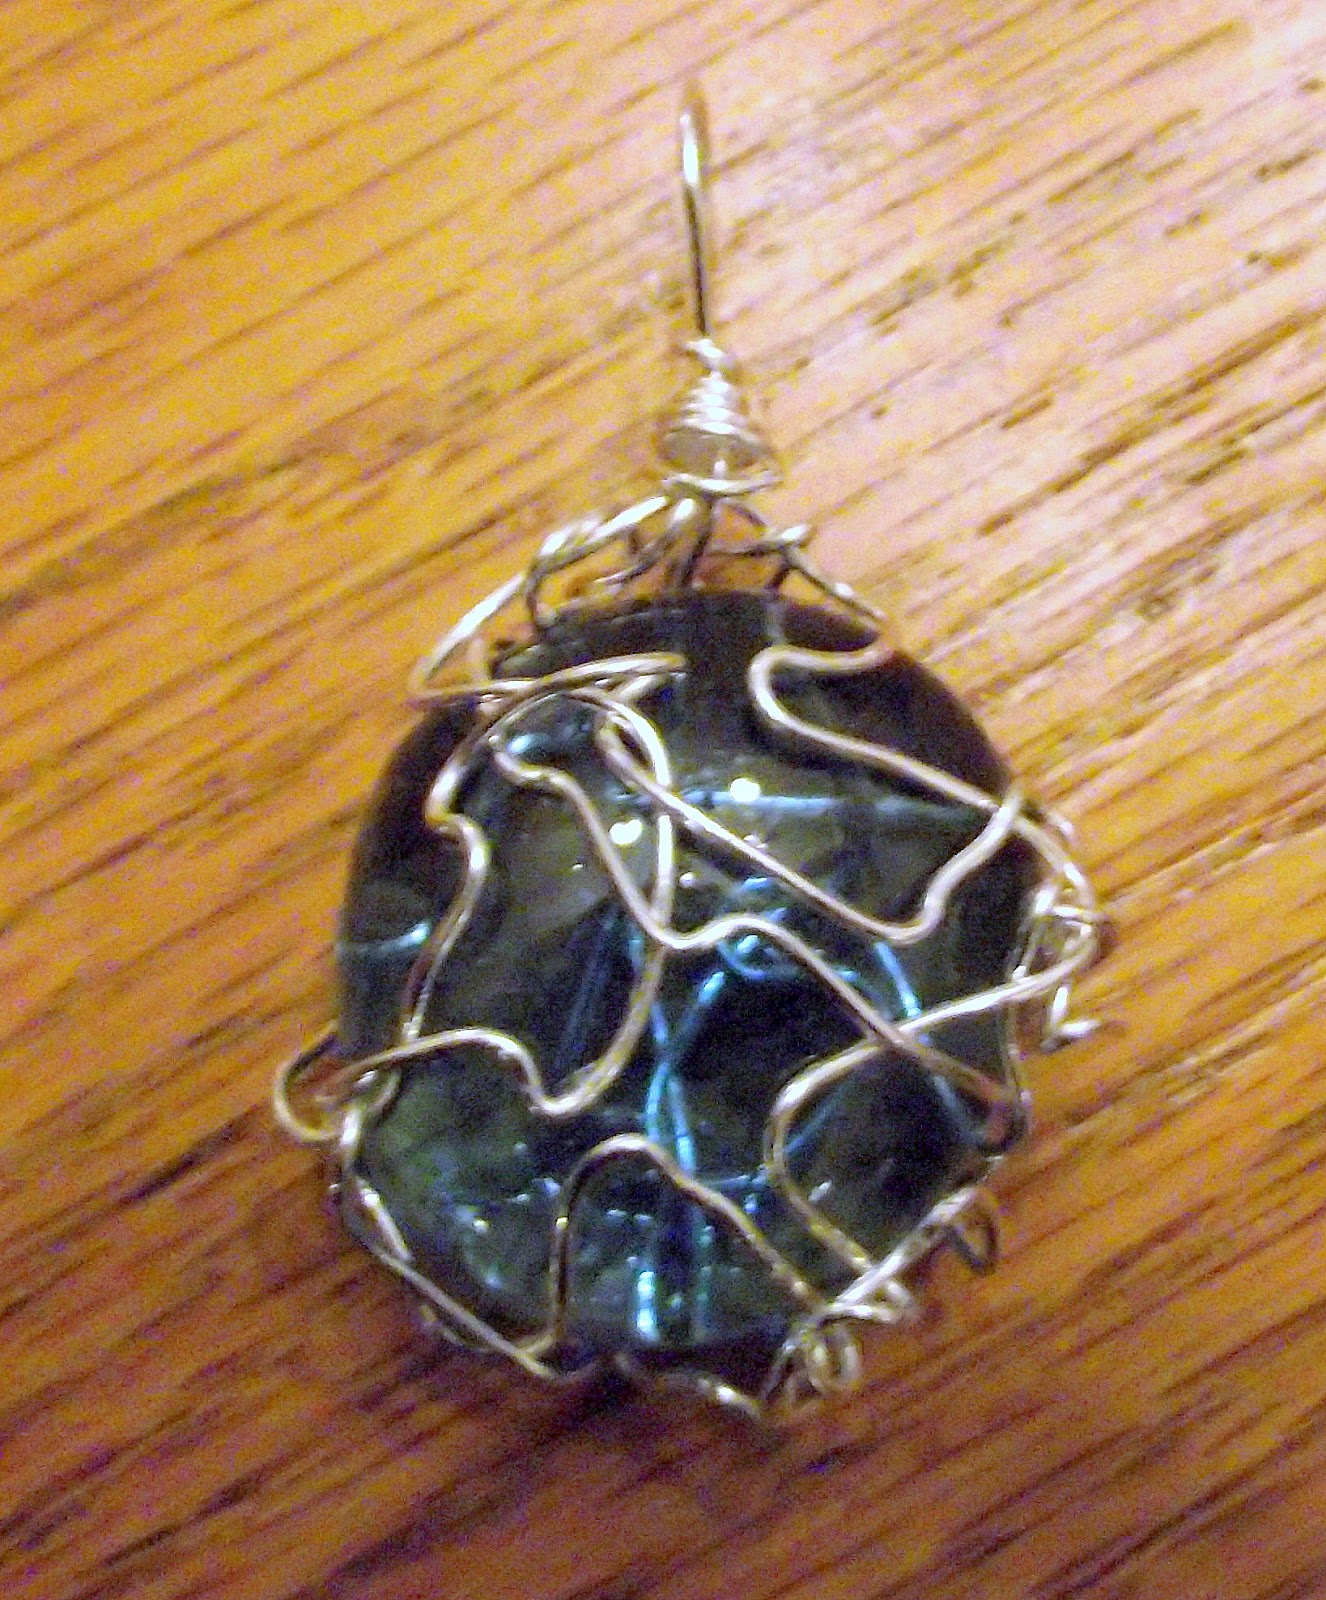
Here is another pendant that I made using one strip of wire in the zigzag pattern, then wrapped around the glass pebble.   It has a single-loop bail.  I made it, thought that it needed a little bit more umph, and put some artistic crooks in the wire with the tightening technique I talked about above.

ONE FINAL NOTE:   You will always be your own worst critic, so do not be overly critical of your design.  If you feel like it doesn't look good, put it away for a day or so, and then look at it again or show someone else to gauge their opinion.  You can always add more wire or bend the wires in a different way that is more pleasing.  Remember, have fun, and don't be afraid to ad lib!

That's it!!