Search

Powered by Blogger.

Networked Blogs

Showing posts with label creative. Show all posts

Thursday, January 10, 2013

Unusual Uses for Common Household Things


We all have little tips and tricks that we use.  I love finding unusual uses for items beyond their normal use.  Some of these may be obvious, some may be new, but they are fun and interesting.  

What little item do you use that is out of the ordinary?  I'd love to know what those are.  Here are some of mine: 


1.    Nail polish remover to take labels off plastic containers.  Saturate a paper towel with nail polish remover.  Wrap it around the item that needs the label or printing removed.  Allow to sit.  Periodically redampen the paper towel, then wipe off the label!  May also use furniture-grade acetone, for this, as well, but be sure to wear gloves. 

2.    Use an antiscratch scrubber kitchen sponge (the kind with a loofa on one side and sponge on the other) in the shower to remove calluses from feet.  If it gets icky, either put it on the top shelf of the dishwasher and run through with a load or put it in a zippered bag and wash it with a load of towels to get clean. 

3.    Aspirin, salt, and water paste for canker sore cure.  This is an old trick that my dentist gave to me long ago to treat canker sores.  Crush an adult aspirin into a powder.  Add an equal amount of salt.  Add enough water to make a paste.  Using a dampened Q-tip, dab a little on the canker sore.  This will burn like crazy, but it “cauterizes” the sore, and it will oftentimes be gone the next day.   (See medical disclaimer below.) 

4.    Make a paste of cooking oil and baking soda as a homemade “Goo Gone” to remove stains and other greasy residue. 

5.    Use white vinegar in your dishwasher’s rinse dispenser in stead of expensive commercial rinse products to stop hard water and soap spots.

6.    A crumpled piece of aluminum foil makes an excellent scrubber if no steel wool pads are available. 

7.    A muffin tin with each compartment filled halfway makes an excellent extra ice tray.  Fill with fruit punch, juice, tea, or Kool-aid for ice that won’t dilute in your drink. 

8.    Use Rain-X meant  to use for windshields on shower doors.  Water spots won’t form, and the shower glass will be easier to clean.

9.    Use car wax to wax sinks and showers.  Clean shower stalls and sinks, then apply a coat of car wax and buff.  This will leave a shiny surface, and soap scum won’t stick to it.

10. Use a sheet of Contact paper with the backing removed for furniture, clothes and car seats to make dog hair and lint pickup an extra quick task. 

11. Want extra long eyelashes?  Clean an old mascara wand, and use it to apply either mineral oil, baby oil, or Vaseline to your eyelashes each night.  This will condition them and help them grow. 

12. Aluminum foil makes a great connector/contact point  if a spring breaks inside a battery compartment of a piece of electronics or a toy. 

13. Mix coffee grounds (used or fresh) and olive oil and use for a facial or body scrub.  The grounds provide an exfoliating effect, the caffeine will help tighten skin and improve circulation, and the olive oil provides moisture.  Rinse well after use.

14. Spray Static Guard on your hair brush to relieve static in your hair or use a fabric softener sheet gently rubbed over your hair to help detangle it.

15. Got stuck-on, burned-on food in a pan or casserole dish?  Place a fabric softener sheet in it, then fill the pot or dish with hot water, and allow to sit overnight.  The gunk will wash off!

16. Got an old T-shirt that is a little on the snug side?  Use it to dry your hair!  Pull just the neck over your head, with the shirt going in the wrong direction, then use the remaining T-shirt to wrap up your hair.  This will dry your hair quickly, hold your hair up while you apply makeup, and is even more gentle than a bath towel. 


Medical disclaimer:  Material on this Website is provided for informational purposes only. It is not a substitute for medical care, consultation, or advice.

Thursday, December 27, 2012

Egg Salad - Broke Food

Normally I reserve egg salad for the time around Easter when we have dozens of boiled eggs, and we're trying to find some use for them.  However, egg salad is also an excellent, tasty, and frugal meal to have any time of year.  

You can make this as a basic recipe with eggs, mayo, a dab of mustard, salt and pepper, or you can turn it into something really exotic by adding ingredients.  I like mine middle of the road, depending on what's lurking in the fridge and my cabinets.  

This is also excellent as a sandwich, or you can eat it alone as a salad.  Serve it with chips, a green salad, or eat on crackers for a change of pace. 

Egg Salad
2-3 hard boiled eggs, peeled and chopped 
1/4 cup mayonnaise (or plain low-fat yogurt)
A dime size squirt of prepared mustard 
salt and pepper to taste 

Mix all ingredients well and refrigerate.  Then serve as you like.  

Additions:  
1 tablespoon dill or sweet relish
1-2 teaspoons minced onion 
chopped celery
chopped green olives 
chopped jalapenos 
chopped green onion 
chopped bell pepper 

Add as many or as few things to your taste and refrigerator can supply! 


Thursday, December 20, 2012

Beans and Franks - Broke Food

Ever have one of those days where you walk to the fridge, open it, there's nothing there... and then 20 minutes later you walk back and repeat the action?  As if somehow something appealing magically appeared during that 20 minute interval.  Then maybe you go to your pantry and do the same thing, and still find nothing?  This old-fashioned favorite might be the solution. 

This is definitely a comfort mood in addition to being broke food.  Plus, tell me you don't have the movie Something About Mary going through your head right now!  Beans and franks are fun, they're delicious, and best of all, they're easy to make and qualify as broke food. 

Beans and Franks 
2 16 oz. cans pork and beans
1 package hotdogs, franks, weenies, wieners, whatever you call them (about 6-8)
1/2  to 2/3 cup barbecue sauce, your choice
1 tablespoon brown sugar or maple syrup
1 tablespoon prepared mustard
1/2 medium onion, chopped, or 1 tablespoon minced dried onion (optional)

For the oven version of this, place all items in a casserole, combine, and cook at 350 degrees for 1 to 1-1/2 hours or until sauce thickens.

For the stovetop version, add all ingredients to a large saucepan.  Heat until bubbles form in mixture, then reduce heat to low, cover, and simmer for 15-20 minutes, stirring periodically to keep mixture from sticking. 

For the microwave version of this, place in a microwave safe casserole.  Cover and microwave on high for 15 minutes, stirring at 5 minute intervals or until heated through and mixture has "boiled down." 


Alternative Recipe 
2 14.5 to 16 oz. cans white beans, navy beans, or pinto beans (in a pinch), drained and rinsed
1/2 cup ketchup
1 to 1-1/2 tablespoons prepared mustard or spicy brown mustard
2 tablespoons brown sugar
1/2 teaspoon cider vinegar
1/2 teaspoon Worcestershire sauce
1/2 medium onion chopped/minced or 1-2 tablespoons minced dried onion
1 package hotdogs cut into medallions
salt and pepper to taste

Mix all ingredients and follow baking, stovetop, or microwave directions noted above.


Monday, December 10, 2012

Turn Your Children's Artwork into Jewelry - Simple Gifts


Do you have a particularly darling piece of artwork that your child has made and would like some way to preserve it and even possibly show it off?  Or how about share it with Grandma or Aunt Susie?  You can easily turn your child's artwork into a pendant!  All it takes is a few art supplies! 

SUPPLIES NEEDED: 
  • Scanned or photographed artwork
  • Glass pebbles or stones from Dollar Tree or other floral supply/aquarium supply places
  • Printed artwork (see below)
  • Aleene's Clear Tacky craft glue
  • One glue-on bail per pendant (see instructions HERE)
  • Mod Podge
  • E6000 adhesive
  • Clear spray paint or clear nail polish.
First, you will need to scan or photograph your child's artwork and save the image to your computer.  You can also take it to Walmart and use their photo printing machines to make tiny photos.  If you download it to your computer, use either Microsoft Word or photo software such as Picasa (free) to resize and retouch the picture.  You will likely need to boost the saturation and contrast to make the colors more vivid. Use the setting that prints showing the entire photo. 

Print out photos in 1 x 1 inch or 1.5 x 1.5 inch squares.  Cut out each photo, and leave enough room so that a little paper is available to stick out on each side of the photo.
Coat the back of the glass marble with the clear tacky glue.  You can use Mod Podge, but it risks smearing the ink because Mod Podge takes longer to dry.  Press the glass to the photo firmly so that the entire photo is adhered to the back of the pebble and there are no bubbles.  


Allow to dry completely, at least a couple of hours.  Once dry, trim excess paper from around glass, and apply 2 thin coats of Mod Podge.  Thin coats are better than thick coats because they take longer to dry and can cause the colors to deteriorate if too much is applied.  
Allow to dry thoroughly between each coat of Mod Podge.  Once dry, secure glue-on bail to the back of the pendant, making sure that the stem and bail stick up at an appropriate point to make the pendant hang straight.  Again, allow to dry thoroughly.  
Once the glue-on bail has completely dried (I recommend 24 hours), coat the entire back of the pendant with either spray-on clear acrylic spray paint (I use Walmart's generic brand) or coat with clear nail polish.  Doing so will give a nearly waterproof seal, as Mod Podge is water soluble and can eventually come off if not sealed.  Allow to dry thoroughly.  

Once completely dry, flip over, and string your wonderful creation on ribbon, chain, a leather cord, or satin rat tail cord.  It will become a darling, personalized keepsake to show off your child's artwork!


Wednesday, November 21, 2012

Simple Gifts - Hardware Store Jewelry


Need a fun, funky, and easy gift idea but don’t want to spend a lot of money?  You may very well have the things you need in your garage or junk drawer!  Here are two necklaces made from components from around the house or that are inexpensive purchases at any local hardware store. 

The first is a metallic, Victorian/steampunk inspired necklace.  Steampunk is known as “industrial Victorian,” as it combines elements of mechanical items, such as gears, wires, and circuitry with Victorian elements such as rhinestones, filigree, and delicate chains. 

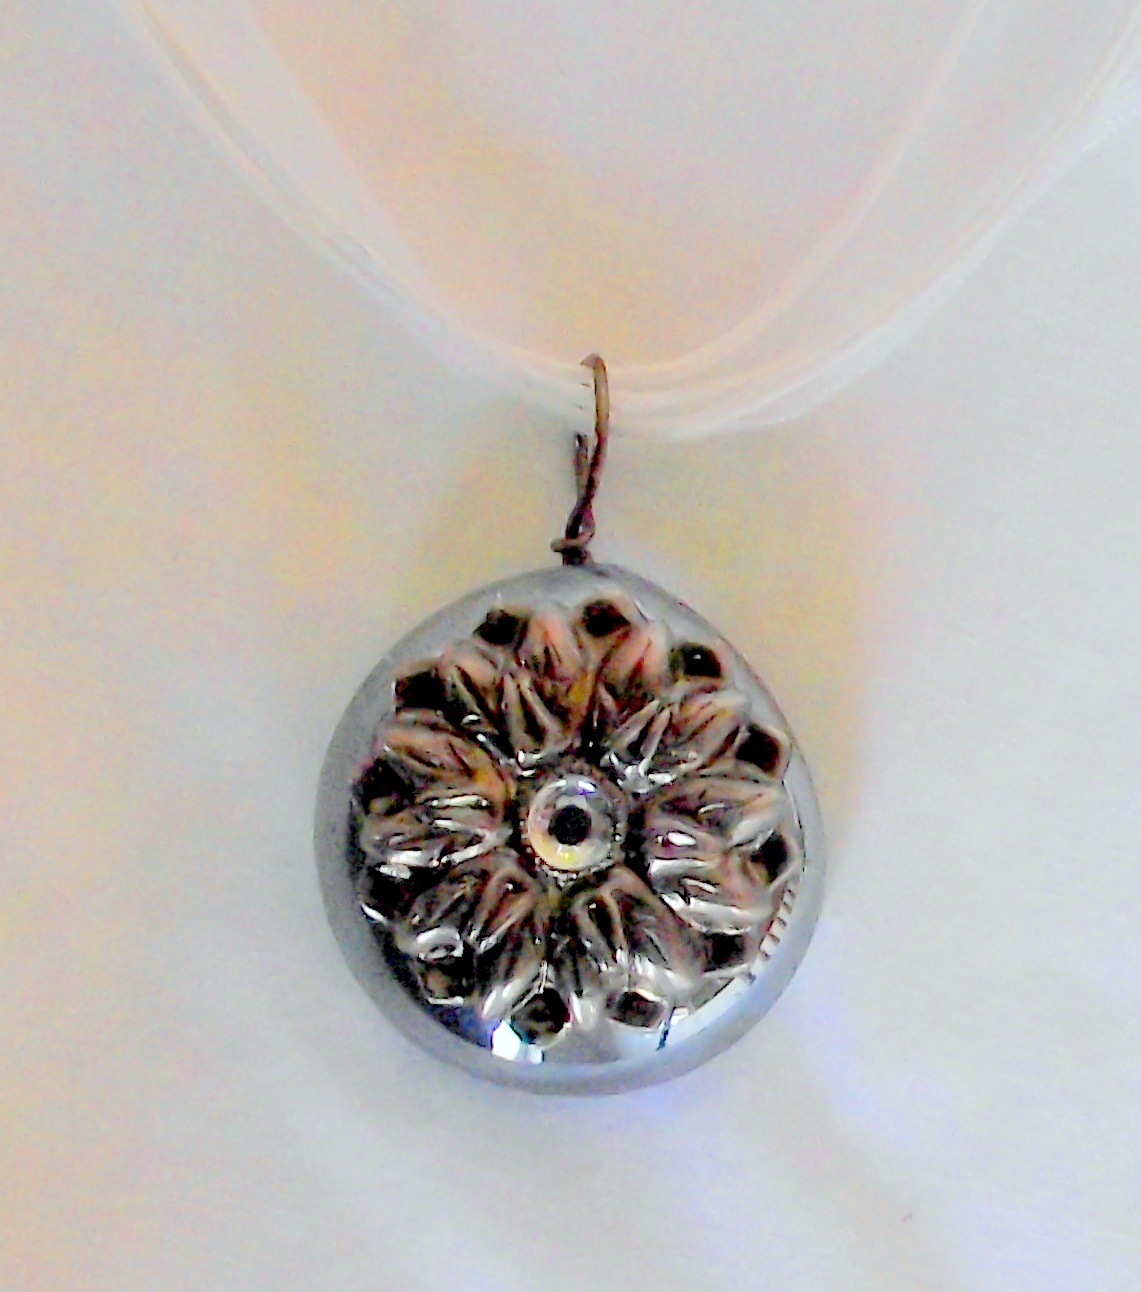
The second is a Victorian pendant made with an iridescent glass pebble and hardware store items.  This is very pretty as a choker or short pendant worn on a ribbon.  

Metallic Victorian/Steampunk pendant
Items Needed
One 2 inch fender washer
One floral mirror mount (these are mounts used to hang mirrors in a bathroom)
One external tooth lock washer
One glue-on rhinestone or other flat-backed pretty item
One glue-on wire bail  (instructions on how to make these HERE)
E6000 glue
Ball chain and connector at least 20 inches (found in hardware or plumbing section)


INSTRUCTIONS:  Place fender washer on flat surface.  Glue mirror mount to washer with E600 glue.  Place glue along bottom of mount, just slightly inward from the outside edges to get a firm seal.  Allow to dry.  


Add lock washer to center of mirror mount.  Place glue along the area which will touch mirror mount the most.  Allow to dry. 


Add flat-backed rhinestone to center of lock washer, and allow to dry.    


Once all components are dry, flip washer over and glue bail to back.  In this photo I have the pendant propped up on a toothpick while drying.  Otherwise, if allowed to dry flat, the bail will tip backward, and pendant will not lay flat when attached to a chain.   


String on ball chain, cut to desired length, and wear!


Victorian Iridescent Glass Pendant
Items Needed
One large iridescent glass pebble (I bought these in a bag at Dollar Tree for $1 in the floral section)
One flower mirror mount
One glue-on flat backed rhinestone or other flat-backed item
One glue-on bail (instructions to make these HERE)
E6000 glue
Ribbon, silk cord, or dainty chain


 INSTRUCTIONS:  Glue bail to flat back of pebble and allow to dry. 


Using sandpaper or a nail file, rough up front domed surface of glass pebble slightly.  Check positioning of mirror mount on front of domed glass and use pliers to bend slightly and contour the mirror mount to the shape of the pebble.  Glue mirror mount to glass pebble and allow to dry.  


Glue flat-backed rhinestone to center of mirror mount and allow to dry. 


Place on ribbon, silk cord, or dainty chain and wear! 

The key to both of these pendants and necklaces is to use what you have on hand.  If you've seen something and the thought popped into your mind that it would make a pretty necklace, use it!  Instead of the mirror mount, you might have a pretty pearl button that came from a coat.  Use that!  Have a length of broken chain?  Use it to wrap the circumference of the button using glue.  Have an old broken watch with an interesting watch face?  Take the watch apart and carefully remove the watch face and use it in the place of the mirror mount.  See an old typewriter key that's flat and has an initial on it or words like "caps lock" instead of a letter?  Use that!   Have old bits of broken jewelry?  Use those.  Snip off broken parts and combine the elements by gluing them to the washer or a glass pebble.  The possibilities are endless and are as interesting as your imagination and junk drawer. 


Sunday, November 4, 2012

Scouring Powder Alternative


We all know there are things that just need a good scrubbing or scouring sometimes.  This is an alternative to the harsh scouring powders that contain bleach (Comet, Ajax, etc.).  It's simply blue Dawn dish soap and baking soda.  Honestly, there aren't too many things that I haven't used Dawn and baking soda to clean.  There will be more of those in later posts, but for now, we'll start with this.  

In order to make your own scouring alternative, using a damp sponge or soft cloth.  Squirt a little Dawn on the sponge or cloth, then sprinkle with baking soda and scrub the surface.  Scrub as you would with a scouring powder, then rinse thoroughly with water.

This works great for things like the bath tub, shower tiles, kitchen sink, counter tops, and I have even used it as cleaner to get bug splats off the front of my car without scratching the paint.  I have been told that it is also acceptable for cleaning flat-topped stoves, though I have not tried it myself, so use at your own risk. 

While it will not necessarily bleach stains, it will remove any substances that are stuck on and does a great job of dissolving oils and soap scum left behind in showers. I like to use it on my stovetop to get the tough, baked-on spills left after cooking.  

It leaves a fresh, clean scent.  It is nontoxic.  It's "green."  It won't hurt septic systems.  It's readily available whenever you need it, and it's economical.  It also cleans great, and is nowhere near as expensive as other scouring powders!


Wednesday, October 24, 2012

Creative Cooking - Grilled Chicken with Chipotle-Bacon Aflredo Sauce and Penne Pasta


 We grilled out a couple of nights ago, and there was one chicken breast remaining. This Chipotle-Bacon Alfredo sauce over penne pasta was a great solution for using that lone leftover chicken breast.  It came together easily and consisted of items I had in my cabinets.  This made a ton of food, enough for two servings plus lunch and dinner the next day. 


GRILLED CHICKEN WITH CHIPOTLE-BACON ALFREDO SAUCE OVER PENNE PASTA

1 grilled chicken breast sliced/diced into pieces
1-2 strips of bacon
1-2 Tbsp. chopped onion
1 can diced tomatoes with Chipotle chiles (I used Red Gold Tomatoes with Chipolte seasoning, but you might have to substitute a can of diced tomatoes with about 1 tablespoon diced chipotle peppers)
1 jar alfredo sauce
About 1 cup shredded cheese (I used Colby-Jack)
4-6 servings of cooked penne pasta

In a large frying pan, fry the slices of bacon until crispy. Remove from pan. Saute chicken and onion in bacon drippings until onion begins to turn translucent. Add can of tomatoes with chipotle and stir together with chicken and onion. Allow to cook until liquid from tomatoes has reduced down. Add alfredo sauce and shredded cheese, cooking to combine and until shredded cheese melts.  Stir in crumbled bacon.  Serve over penne pasta. 


Monday, October 15, 2012

Freezer to Crockpot or Grill 2


Sunday night, I hurriedly whipped up a batch of 3 freezer to crock pot recipes and 1 freezer to to grill recipe. Some notes about making these recipes:  I show these packed flat, but when I put them in the freezer, I tend to stand the bags upright and make them as round as I can so that they will fit the shape of the crock pot.  I use a 5 quart crock pot/slow cooker.  If you have a smaller, 1-2 quart slow cooker, you might want to divide these into two bags.

I cook these recipes straight from the freezer.  I do not thaw them first, as I've found that sometimes the recipes with flour in them will clump.  It's perfectly safe to cook from frozen, and the food comes out just the same as if it were thawed.

To remove the frozen chunk from the bag, I either run hot water over the outside enough to loosen things, or run hot water into a plugged sink and submerge the bag for a few seconds to loosen the contents.

Finally, it helps to stir things and let it cook just a little bit more right before you're ready to serve.  This distributes all the ingredients well and makes sure nothing is clumped. Some of these recipes make their own type of gravy, so it's important to stir before serving to make sure everything's where it should be. 

Here are the recipes I used:


Mango Chipotle Chicken for the Grill

3-4 boneless skinless chicken breasts
2 tablespoons Poultry/Chicken Seasoning

Place chicken in a 1 gallon zippered freezer bag, add ingredients, squeeze air out of bag, then seal and “massage” to distribute seasonings well.  When it’s grill time, remove from the freezer and allow to thaw in the refrigerator, then place on grill, cook to desired doneness and enjoy!


Smothered Pork Chops
3-4 boneless pork tenderloins/chops (See earlier postregarding savings on meat)
1 large onion, cut into rings
1 can cream of chicken or cream of mushroom soup
About 1 tablespoon Montreal/Canadian Steak seasoning 

4-6 peeled and sliced potatoes when ready to cook

Season pork tenderloins with steak seasoning, and layer with onions in 1 gallon zippered freezer bag.  Add cream soup and remainder of steak seasoning.  Squeeze air out of bag and seal.  Freeze.  When ready to cook peel and slice 4-6 potatoes and place them in the bottom of the crock pot.  Then place the entire block of frozen food on top of this in the crock pot and cook on high for 4-6 hours or low for 6-8 hours.   Serve over noodles or toast. 


Easy Beef Tips
½ cup flour
½ teaspoon pepper
1 packet onion soup mix
½ medium onion, chopped
1 can beef stock (or 1 cup water plus 1 beef bouillon cube or 1 Tbsp. bouillon granules)

Place flour and pepper in 1 gallon zippered bag.  Shake to mix.  Add stew meat into bag, reseal, and shake to coat stew meat well.  Reopen bag and add in remaining ingredients.   Squeeze out air, and seal. Cook on high 4-6 hours or low 6-8 hours.  If this seems a bit thin/watery, remove the lid from the crock pot, turn the crock on high, and cook another hour to allow some of the water to evaporate. Serve over noodles or rice.


Pepper Steak
2-3 pounds beef stew meat (See earlier post regarding saving on meat)
½ cup flour
1 tsp. pepper
1 large onion, chopped
4-5 cloves garlic (I use the already-minced garlic and use 2-3 teaspoons)
2 green/bell peppers, cut in strips
2 14 oz. cans Italian or plain diced tomatoes with ½ teaspoon Italian seasoning
2 cubes beef bouillon or 2 Tbsp. beef bouillon granules
4 tsp. Worchestershire sauce
2 Tbsp. A1 steak sauce

Place flour and pepper in zippered freezer bag.  Shake to mix.  Add stew meat and shake to coat pieces thoroughly.  Add remaining ingredients, remove air, and seal.  Cook on high for 4-6 hours or low 6-8.  Serve over noodles or rice.  


Monday, October 8, 2012

Homemade Fabric Refresher Spray Like Febreze


I love deodorizing sprays like Febreze, particularly for those days when you walk in the house and can smell everything that just happened in the last 24 hours and some that were even further back than that.

What I don't like is the price!  Depending on where you shop and whether you have coupons, the price is between $3.00 and $5.00 for one bottle.  

There's a much less expensive alternative that works just as well, and you can make it from ingredients you probably have sitting around.  I love using these homemade versions to spray around the house, on the carpets, couches, bedding, and to just randomly squirt throughout a room.

Here are my two versions.  

Homemade Febreze
1 part liquid fabric softener (I like Gain) 
1 part isopropyl or rubbing alcohol  
2 parts water 

Homemade Febreze Recipe #2 
1 part liquid fabric softener  
1 part isopropyl or rubbing alcohol 
1/2 teaspoon baking soda 
2 parts water 

I use 1/2 cup Gain, 1/2 cup rubbing alcohol, and 1 cup water, but I have made a larger quantity using the same ratios.

Mix well and pour into spray bottle, then spritz wherever odors are evident.

NOTES:
The rubbing alcohol is needed to perform two functions.  The first is to act as an antibacterial.  The second is that it allows the water in the solution to evaporate faster so that splotches of water, resulting in  water circles, are not left on items sprayed.

For the second recipe, the baking soda is, again, optional.  In my experience, it can leave a white, powdery residue on items when dry, but it does help with deodorizing properties.

I hope this economical version is pleasing, and I'd love to know what has worked for you. 

Thursday, October 4, 2012

Chili Redux - Frito Chili Pie


Hungry?  Have stuff that you need to use up in your fridge?  This is a great example of how to do that.  It's called Frito Chili Pie.  I'm sure my local friends are groaning and saying, "Really?  You're using that as a recipe of sorts?"  Well, yes.  Because I realize not everyone knows how to make this awesome stuff.  Technically, it might also be classified as what we call broke food, but sometimes broke food is the best.  (Broke food:  Anything that is yummy, filling, sometimes made from weird ingredients, and will feed you until payday.) 

I made a pot of crock pot chili a couple of days ago.  Now there's a little bit left, and we're tired of just eating straight bowls of chili.  This is our way of changing things up while still using the leftover chili.  I'll also have some things for substitutions/additions below.  

Traditional Frito Chili Pie 
A handful of crushed Frito's corn chips*
About 3/4 to 1 cup prepared chili
Shredded cheese 
Diced onions 

Additions and substitutions:   
Crumbled tortilla chips instead of Fritos 
Sour cream
Sliced black or green olives
Shredded lettuce and diced tomatoes or your little bit of leftover salad 
Wrap it all in a tortilla, and cover with salsa 

*If you want a real tailgate party, ballgame concession stand Frito chili pie, then you get an individual-size bag of Fritos (those tiny ones you get in the mlutipacks), crush the Fritos inside, slit it open lengthways, and dump your chili fixings in.  Eat straight out of the bag with a plastic spoon while wrapped in a fleece throw, sitting at a football game.

Enjoy!!